Fast forward a couple years, and we found ourselves waist deep in searches on the internet, and totally boggled by the whole new world and language of hot glass and lampwork. It was a lot to absorb- loads of torches with tons of specifications that read like Greek, tons of glass, differing COEs, and tools out the wazoo.
It was like stepping through a portal onto another planet. We were in total brain arrest trying to sift through all the information, translate it, and make decisions of varying expense. It was like being caught in quicksand, the more you tried to figure it out, the more stuck you were in the predicament.
Finally, one day we decided that, if we were going to try this lampworking thing, and see if we even had a knack for it or a true interest, then we needed to do it on a shoestring. So, that is where we started... dangling from the aglet of a frayed financial shoestring.
For us, the answer to the newbie, entry-level, lampwork-for-idiots, on-a-shoestring dilemma lay in the treasured and prized "40% off One Item Coupon" from our local Hobby Lobby. There we found the Fireworks Beadmaking Lampwork Kit, for the bargain price of $99, and that coupon made it a little over $60 out the door- including glass! That plus a $9 Mapp gas canister put us on the threshold of the molten glass experience!!
It was just enough to get our feet wet: A Fireworks torch and clamp, a fireproof surface, ceramic fiber blankets, mandrels, bead release, two marvers, one glass rake, and a mix of glass rods. Plus a beginner beadmaker booklet to get you started, thin but better than winging it alone.
In no time at all, with the ever fraying shoestring in mind, we were making the trek to our beloved Harbor Freight tool supply. The goal: to find an eclectic selection of affordable tools that could manipulate our melted glass. Bags bulging with plier sets, stainless spatula sets, pick sets, clamps, stainless dental picks, and miniature files brought us to the next level of our lampworking experience.
Add a copy of Cindy Jenkins affordable and informative book for beginning beadmakers and lampworkers ($14.95), and we were well on our way to developing a feel for the glowing medium we so enjoyed.
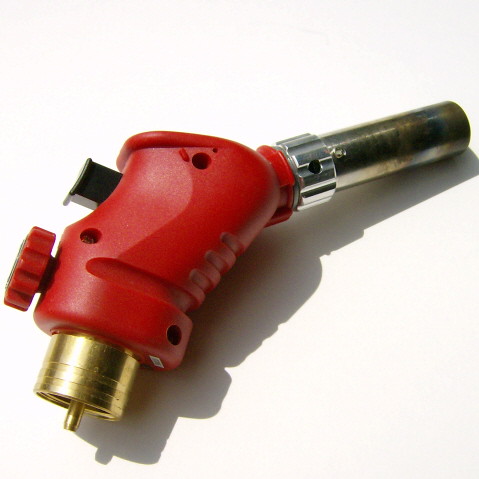
The Fireworks torch, also referred to as the "QT" (quiet torch), gets a lot of flak in the lampwork community, but for what it is- the absolute bottom-rung on the lampwork torch ladder- it does the job. It gets the beginner familiar with torch setup, safety, and the physical properties and behaviors of molten glass. It has a very cool flame (this is relative as compared to other super hot torches- don't stick you hand in there or let your kids play with it- LOL), so the glass melts slowly, and it is easy to pull stringer and learn to make twisties. You learn to watch the flow and glow of the glass and get a feel for when it is happy and when it isn't, and the coolness of the flame makes this all slow motion. It melts pastels (solid colors) faster than transparents which tend to need a bit more heat to get moving and workable, so it isn't the best torch for learning to encase. When working on perfecting round beads, stringers, and dot work, it does the job.
On the down side of the Fireworks torch, the automatic lighter only worked once, after that we used our grill lighter. Also, using small canisters, once the canister is about 1/2 empty, it starts to freeze up, so the already cool flame gets cooler and next to impossible to melt anything with it. So, the canister has to be submerged in warm water, or have a heating pad wrapped around it on low, to help keep the gas moving to the torch with enough pressure to keep the flame hot.
In just two months of minimal use, I had killed my first Fireworks, bought a second one at $29.99 (with my trusty 40% coupon), and had sent off to Sundance to get my first Hothead torch. We also made our family crockpot a dedicated vermiculite pot for garaging beads, such a worthy job!! :D
So, even with buying the kit, the second Fireworks torch, Mapp gas, extra glass, tools, and a Hothead... we still managed to keep our start up at under $200.
You can learn to lampwork on a shoestring. Remember, it isn't the torch that makes you a artist, it all comes down to skill. Don't be embarrassed to start wherever you have to, in time you can realize your dream. 8)


1 comment:
I find this post so encouraging! I've taken a glass slumping/fusing workshop, and am scheduled for the next one in March.I'm itching to get into this, but on a shoestring. So nice to hear of someone else who has done just that. One problem I need to resolve is studio space: I rent the main floor of a house, and the basement is dark & dingy and not able to be properly ventilated... and I am leery to use the livingroom or computer room, because of glass dust. Oh, and I love yor fanciful creations!
Post a Comment