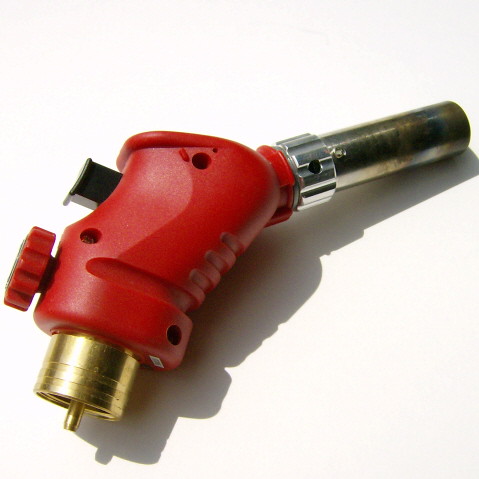
Our flame throwing workhorse is the ever faithful Hothead. This little torch catches some undeserved flak since it is a bare bones, single gas torch considered by some as only fit for beginners. Yes, there is a bit of torch snobbery that goes on in the glass world from time to time (like anything in life), and the other day a fellow lampworker stated that the Hothead was only good as a paperweight. LOL. Well, our paperweight makes some fine beads and sculptures, what does yours do?
The Hothead is practically indestructible, easy on the pocketbook, easy to set up, easy to use, and extra-easy on the fuel. Other than our newbie beads, which were made on a fireworks, all our work to date has been created on this little wonder. A worthy torch in its own class. Granted, this torch, like any other, is only as good as the skill of the person behind it. Rounds, disks, encasing, hollows, murrine, millifiore, reduction, silverwork, enamels, beads and sculptures up to 2 inches long... all quite doable. Works great with any 104COE glass or higher (ie. Satake).
Recently we've begun the process of considering and researching other torches to fit our needs and style, hence the discussion that led to the paperweight comment. You might wonder why, if the Hothead is so wonderful, would there be a need for another torch. The biggest reason is that we need a larger flame if we want to make larger projects. Also, melting large diameter rods or making murrine takes a lot of time and patience on a Hothead. Another consideration is that it is easier to melt 90 or 96 COE glass on a hotter torch, or even the more resilient 33COE boro if you get a hot enough upgrade.
How to shop for a torch:
Are you on the market for buying a new torch?
You wouldn't believe how many torches and brands of torch there are for glasswork. Carlisle, Nortel, National, Bethlehem, GTT, etc. Each with its own pros and cons, each able to handle certain glass or types of work. Torches for glass blowing, torches for just boro, torches for just soft glass, torches that have bushy flames for large work, or tight flames for small work, torches that have more knobs than a car stereo to let you customize your flame needs... Torches that look like flamethrowers, or torches that look like a small soldering torch. Some have changeable tips that allow them to do many things, others are simple. Prices range from $200 to $3000 or more. There is nothing simple, or cheap, about getting a new torch. It is not a decision made to be made lightly if you don't want to be back on the market for a new torch in 6 months because the torch you got didn't fit your needs.
It is important to narrow down what you plan to do with your torch, and also take into account directions of interest you may want to dabble around in from time to time. Will you work with soft glass, hard glass, or both? Will you be working on small projects like beads and the occasional marble or will you be stretching out more into sculpting, if so- how big? Will you use tanked oxygen or an oxycon (oxygen concentrator)? Do you foresee possibly needing a footpedal controller later down the road? What is the price range you can afford to consider? Do you have adequate ventilation for the type of work and size of torch you are considering?
Once you have your list of needs, it is time to get down to specs on torches and see what fits the bill. Catalogs are an invaluable tool for descriptions of torches, capabilities, and prices, a great resource for information. They are also nice because you can flip through them and comparison shop easily between them. You'd be amazed at how some companies can offer some nice specials if you are buying a full torch set up or kit. It can pay to shop around.
Another place you can find good information on torches is the Online forum glass communities, tons of folks who already have the torches, or had them, and are happy to discuss their torch experience. This is the place where you can run a search and find out the good, bad, and ugly on your torch choices. Some torches are more prone to breakdown or clogging, some are oxygen or propane hogs, some don't produce the same quality of heat or control that others might in the same price range (or sometimes less). Sure sometimes there is the odd lemon which may be 1 in 1000, but if you find a half dozen people had $500 lemons within a certain torch type and the customer service with the company basically sucked when they tried to get help... then you might want to take that into consideration when shopping.
All that research and careful planning should narrow the field down for you to one or maybe two torches. From there it is just matter of placing your order, or sometimes you can find one used from someone who had to upgrade because they didn't get the torch they really needed the first time... :D... or couldn't afford it at the time.
Our personal search has narrowed itself to the GTT Lynx. We considered many, many, many models for our particular style and needs, but narrowed it down to the GTT Cheetah or the Lynx. The Lynx won out because it offers a very fine flame range down to 1mm. What we really want at some point is a GTT Phantom, which incorporates lynx torch center but has many more ports around it for a nice large flame when needed, but that will have to be an upgrade down the road a little ways off.
For those who love their Hothead torch, it is a fine workhorse, worthy of your admiration. It will hold its own nicely.
For those who are shopping for something to allow them to work larger or hotter- Happy Shopping!!! 8)
This is where we share all our news, tutorials, and creations! Bookmark us and check in for all our new lampwork, polymer, glass fusing, silver work, beads, jewelry, custom knives, and custom gunsmithing!
Showing posts with label equipment. Show all posts
Monday, August 4, 2008
Thursday, June 26, 2008
We All Start Somewhere!
My first exposure to the world of molten glass was at an annual local Viking Festival. One of the vendors had a lampwork beadmaking demonstration, and it was fascinating to watch her work. It planted a seed, the idea that working with glass was attainable for the average human who was motivated to try.
Fast forward a couple years, and we found ourselves waist deep in searches on the internet, and totally boggled by the whole new world and language of hot glass and lampwork. It was a lot to absorb- loads of torches with tons of specifications that read like Greek, tons of glass, differing COEs, and tools out the wazoo.
It was like stepping through a portal onto another planet. We were in total brain arrest trying to sift through all the information, translate it, and make decisions of varying expense. It was like being caught in quicksand, the more you tried to figure it out, the more stuck you were in the predicament.
Finally, one day we decided that, if we were going to try this lampworking thing, and see if we even had a knack for it or a true interest, then we needed to do it on a shoestring. So, that is where we started... dangling from the aglet of a frayed financial shoestring.
For us, the answer to the newbie, entry-level, lampwork-for-idiots, on-a-shoestring dilemma lay in the treasured and prized "40% off One Item Coupon" from our local Hobby Lobby. There we found the Fireworks Beadmaking Lampwork Kit, for the bargain price of $99, and that coupon made it a little over $60 out the door- including glass! That plus a $9 Mapp gas canister put us on the threshold of the molten glass experience!!
It was just enough to get our feet wet: A Fireworks torch and clamp, a fireproof surface, ceramic fiber blankets, mandrels, bead release, two marvers, one glass rake, and a mix of glass rods. Plus a beginner beadmaker booklet to get you started, thin but better than winging it alone.
In no time at all, with the ever fraying shoestring in mind, we were making the trek to our beloved Harbor Freight tool supply. The goal: to find an eclectic selection of affordable tools that could manipulate our melted glass. Bags bulging with plier sets, stainless spatula sets, pick sets, clamps, stainless dental picks, and miniature files brought us to the next level of our lampworking experience.
Add a copy of Cindy Jenkins affordable and informative book for beginning beadmakers and lampworkers ($14.95), and we were well on our way to developing a feel for the glowing medium we so enjoyed.

The Fireworks torch, also referred to as the "QT" (quiet torch), gets a lot of flak in the lampwork community, but for what it is- the absolute bottom-rung on the lampwork torch ladder- it does the job. It gets the beginner familiar with torch setup, safety, and the physical properties and behaviors of molten glass. It has a very cool flame (this is relative as compared to other super hot torches- don't stick you hand in there or let your kids play with it- LOL), so the glass melts slowly, and it is easy to pull stringer and learn to make twisties. You learn to watch the flow and glow of the glass and get a feel for when it is happy and when it isn't, and the coolness of the flame makes this all slow motion. It melts pastels (solid colors) faster than transparents which tend to need a bit more heat to get moving and workable, so it isn't the best torch for learning to encase. When working on perfecting round beads, stringers, and dot work, it does the job.
On the down side of the Fireworks torch, the automatic lighter only worked once, after that we used our grill lighter. Also, using small canisters, once the canister is about 1/2 empty, it starts to freeze up, so the already cool flame gets cooler and next to impossible to melt anything with it. So, the canister has to be submerged in warm water, or have a heating pad wrapped around it on low, to help keep the gas moving to the torch with enough pressure to keep the flame hot.
In just two months of minimal use, I had killed my first Fireworks, bought a second one at $29.99 (with my trusty 40% coupon), and had sent off to Sundance to get my first Hothead torch. We also made our family crockpot a dedicated vermiculite pot for garaging beads, such a worthy job!! :D
So, even with buying the kit, the second Fireworks torch, Mapp gas, extra glass, tools, and a Hothead... we still managed to keep our start up at under $200.
You can learn to lampwork on a shoestring. Remember, it isn't the torch that makes you a artist, it all comes down to skill. Don't be embarrassed to start wherever you have to, in time you can realize your dream. 8)
Fast forward a couple years, and we found ourselves waist deep in searches on the internet, and totally boggled by the whole new world and language of hot glass and lampwork. It was a lot to absorb- loads of torches with tons of specifications that read like Greek, tons of glass, differing COEs, and tools out the wazoo.
It was like stepping through a portal onto another planet. We were in total brain arrest trying to sift through all the information, translate it, and make decisions of varying expense. It was like being caught in quicksand, the more you tried to figure it out, the more stuck you were in the predicament.
Finally, one day we decided that, if we were going to try this lampworking thing, and see if we even had a knack for it or a true interest, then we needed to do it on a shoestring. So, that is where we started... dangling from the aglet of a frayed financial shoestring.
For us, the answer to the newbie, entry-level, lampwork-for-idiots, on-a-shoestring dilemma lay in the treasured and prized "40% off One Item Coupon" from our local Hobby Lobby. There we found the Fireworks Beadmaking Lampwork Kit, for the bargain price of $99, and that coupon made it a little over $60 out the door- including glass! That plus a $9 Mapp gas canister put us on the threshold of the molten glass experience!!
It was just enough to get our feet wet: A Fireworks torch and clamp, a fireproof surface, ceramic fiber blankets, mandrels, bead release, two marvers, one glass rake, and a mix of glass rods. Plus a beginner beadmaker booklet to get you started, thin but better than winging it alone.
In no time at all, with the ever fraying shoestring in mind, we were making the trek to our beloved Harbor Freight tool supply. The goal: to find an eclectic selection of affordable tools that could manipulate our melted glass. Bags bulging with plier sets, stainless spatula sets, pick sets, clamps, stainless dental picks, and miniature files brought us to the next level of our lampworking experience.
Add a copy of Cindy Jenkins affordable and informative book for beginning beadmakers and lampworkers ($14.95), and we were well on our way to developing a feel for the glowing medium we so enjoyed.

The Fireworks torch, also referred to as the "QT" (quiet torch), gets a lot of flak in the lampwork community, but for what it is- the absolute bottom-rung on the lampwork torch ladder- it does the job. It gets the beginner familiar with torch setup, safety, and the physical properties and behaviors of molten glass. It has a very cool flame (this is relative as compared to other super hot torches- don't stick you hand in there or let your kids play with it- LOL), so the glass melts slowly, and it is easy to pull stringer and learn to make twisties. You learn to watch the flow and glow of the glass and get a feel for when it is happy and when it isn't, and the coolness of the flame makes this all slow motion. It melts pastels (solid colors) faster than transparents which tend to need a bit more heat to get moving and workable, so it isn't the best torch for learning to encase. When working on perfecting round beads, stringers, and dot work, it does the job.
On the down side of the Fireworks torch, the automatic lighter only worked once, after that we used our grill lighter. Also, using small canisters, once the canister is about 1/2 empty, it starts to freeze up, so the already cool flame gets cooler and next to impossible to melt anything with it. So, the canister has to be submerged in warm water, or have a heating pad wrapped around it on low, to help keep the gas moving to the torch with enough pressure to keep the flame hot.
In just two months of minimal use, I had killed my first Fireworks, bought a second one at $29.99 (with my trusty 40% coupon), and had sent off to Sundance to get my first Hothead torch. We also made our family crockpot a dedicated vermiculite pot for garaging beads, such a worthy job!! :D
So, even with buying the kit, the second Fireworks torch, Mapp gas, extra glass, tools, and a Hothead... we still managed to keep our start up at under $200.
You can learn to lampwork on a shoestring. Remember, it isn't the torch that makes you a artist, it all comes down to skill. Don't be embarrassed to start wherever you have to, in time you can realize your dream. 8)
Labels:
art,
artist,
beads,
beginner,
equipment,
flamework,
flameworking,
getting started,
Hawley Studios,
how to,
kit,
Lampwork,
Lampworking,
learning,
newbie,
studio,
tools,
torch
Subscribe to:
Posts (Atom)
About Us
- Hawley Studios
- Texas, United States
- Welcome to Hawley Studios!!
This is the place where imagination and fire collide! Wherever our imagination and creativity take us, that is where we go! The sky is the limit......
20 years together has caused this married couple to play with fire, hammer and grind metal, and design guns and knives! LOL!! Welcome to our world of marital bliss!!
Enter in to experience creations of glass, polymer, silver, metal... whatever we can get our hands on! :D
Hawley Studios is family owned. We specialize in lampworking, fusing, slumping, jewelry, metal work, custom knife making, and custom gunsmithing.
Proud Members of:
* Etsy Christian Artists Street Team (CAST)
* Creative Glass Guild of Esty (CGGE)
* Etsy Lampwork Etc. Street Team (LEST)
* Self Representing Artists- lampworking (SRA #H109)