This is where we share all our news, tutorials, and creations! Bookmark us and check in for all our new lampwork, polymer, glass fusing, silver work, beads, jewelry, custom knives, and custom gunsmithing!
Monday, June 30, 2008
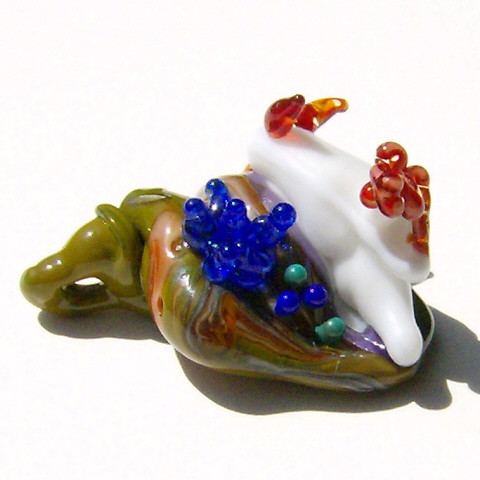
Nudibranch Lampwork Pendant Gallery 1
The first lampwork nudibranch in this sculpture pendant series is a blended base of silvered Vetrofond Dark Ivory, Vetrofond Dark Avocado Marble odd, Effetre Red Roof Tile, and Effetre Light Amber.
The nudibranch is made of Vetrofond Black with Effetre Intense Black and Effetre Clear, and detailed with stringer of Effetre White encased in Effetre Dark Aqua tranparent, and twistie of Effetre Intense black, Effetre Dark Turquoise, and Effetre Clear.
The coral is Effetre Dark Red and Vetrofond Bloody Mary odd, and the sea squirts are Effetre Light Green Transparent with Effetre Grass Green Opalino centers, and Effetre Petroleum Green highlights.
Inspired by Anthony Wooldridge's "Nudibranch 3" Photo.
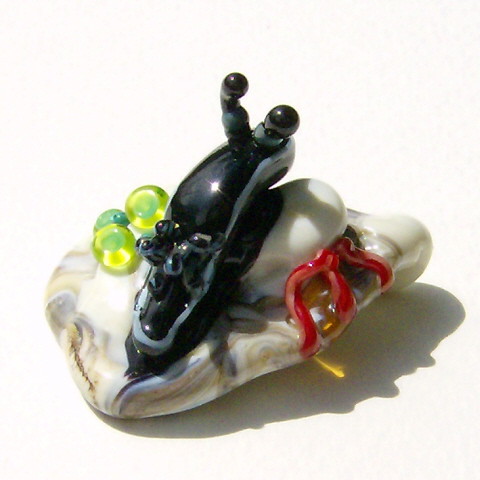
The second nudibranch in this lampwork pendant series is on a blended base of silvered Vetrofond Dark Ivory, Vetrofond Orange Dreamsicle odd, Effetre Red Roof Tile, Effetre Light Amber, and Vetrofond Bloody Mary odd.
The nudibranch is Vetrofond Black and Effetre Intense Black, with custom mixed accent glass.
The red coral is Effetre Dark Red and Vetrofond Bloody Mary odd. The yellow coral is Effetre Light Yellow. The Anenomes are Effetre White with Effetre Dark Teal Transparent accents.
This lampwork sculpture was inspired by gt60k's photo "Nudibranchs".
The third nudibranch in this lampwork pendant series is on a blended base of silvered Vetrofond Dark Ivory, Vetrofond Mighty Azuritey odd, Effetre Gray, Effetre Intense Black, Vetrofond Lime Sweet odd, and Vetrofond Smoke Rings odd.
The nudibranch is Effetre Anise White and Effetre White, with Effetre Orange, Effetre Transparent, and Vetrofond Red Transparent accent stringer.
The red coral is Effetre Dark Red and Effetre Light Yellow, and Effetre Transparent. The blue anenome is Effetre Pale Blue Transparent, Effetre Cobalt Transparent, and Effetre Cobalt twistie. The sea squirts are Effetre Petroleum Green and Effetre Dark Cobalt.
This lampwork sculpture was inspired by Colin Zylka's photo "Nudibranchs, Lembeh Straits, Indonesia".
Labels:
art,
beads,
effetre,
flamework,
flameworking,
glass,
Hawley Studios,
Hawleyclan,
Lampwork,
Lampworking,
nudibranch,
nudibranchs,
off mandrel,
pendant,
sculpting,
sculpture,
sea slug,
slugs,
vetrofond
Friday, June 27, 2008
Treasured Newbie Beads
This necklace is a tribute to all our newbie beads! The beads that initiated us into the world of hot glass lampworking!
They represent that special time when getting the glass onto the mandrel without breaking the bead release was an accomplishment, and managing to get puckers on the bead ends meant that you had arrived!!
Starting on the far right with our first plain white Effetre round beads, those are the very first beads we made, one is mine and one is hubby's. The beads move chronologically to the left, and gradually improve in shape and design as you go around the necklace, ending with my amethyst hollow (man, that one was hard).
All of these beads are made on a Fireworks torch and 1/8 in mandrels, out of the fireworks beginners lampworking bead kit we bought to get our feet wet.
You can read my more detailed photo notes on the various beads here at Flickr.
Labels:
artist,
beads,
beginner,
beginning,
fireworks,
flamework,
flameworking,
glass,
Hawley Studios,
Hawleyclan,
jewelry,
Lampwork,
Lampworking,
newbie,
torch
Thursday, June 26, 2008
We All Start Somewhere!
My first exposure to the world of molten glass was at an annual local Viking Festival. One of the vendors had a lampwork beadmaking demonstration, and it was fascinating to watch her work. It planted a seed, the idea that working with glass was attainable for the average human who was motivated to try.
Fast forward a couple years, and we found ourselves waist deep in searches on the internet, and totally boggled by the whole new world and language of hot glass and lampwork. It was a lot to absorb- loads of torches with tons of specifications that read like Greek, tons of glass, differing COEs, and tools out the wazoo.
It was like stepping through a portal onto another planet. We were in total brain arrest trying to sift through all the information, translate it, and make decisions of varying expense. It was like being caught in quicksand, the more you tried to figure it out, the more stuck you were in the predicament.
Finally, one day we decided that, if we were going to try this lampworking thing, and see if we even had a knack for it or a true interest, then we needed to do it on a shoestring. So, that is where we started... dangling from the aglet of a frayed financial shoestring.
For us, the answer to the newbie, entry-level, lampwork-for-idiots, on-a-shoestring dilemma lay in the treasured and prized "40% off One Item Coupon" from our local Hobby Lobby. There we found the Fireworks Beadmaking Lampwork Kit, for the bargain price of $99, and that coupon made it a little over $60 out the door- including glass! That plus a $9 Mapp gas canister put us on the threshold of the molten glass experience!!
It was just enough to get our feet wet: A Fireworks torch and clamp, a fireproof surface, ceramic fiber blankets, mandrels, bead release, two marvers, one glass rake, and a mix of glass rods. Plus a beginner beadmaker booklet to get you started, thin but better than winging it alone.
In no time at all, with the ever fraying shoestring in mind, we were making the trek to our beloved Harbor Freight tool supply. The goal: to find an eclectic selection of affordable tools that could manipulate our melted glass. Bags bulging with plier sets, stainless spatula sets, pick sets, clamps, stainless dental picks, and miniature files brought us to the next level of our lampworking experience.
Add a copy of Cindy Jenkins affordable and informative book for beginning beadmakers and lampworkers ($14.95), and we were well on our way to developing a feel for the glowing medium we so enjoyed.
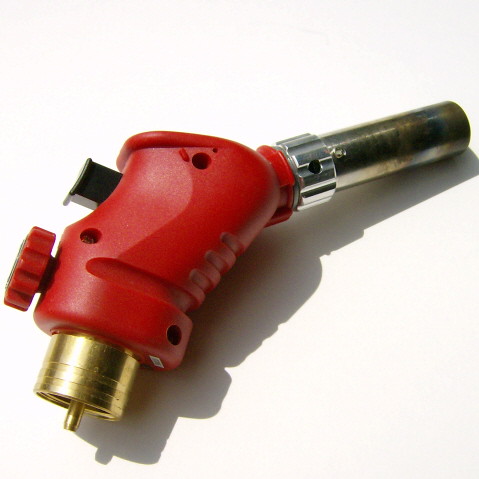
The Fireworks torch, also referred to as the "QT" (quiet torch), gets a lot of flak in the lampwork community, but for what it is- the absolute bottom-rung on the lampwork torch ladder- it does the job. It gets the beginner familiar with torch setup, safety, and the physical properties and behaviors of molten glass. It has a very cool flame (this is relative as compared to other super hot torches- don't stick you hand in there or let your kids play with it- LOL), so the glass melts slowly, and it is easy to pull stringer and learn to make twisties. You learn to watch the flow and glow of the glass and get a feel for when it is happy and when it isn't, and the coolness of the flame makes this all slow motion. It melts pastels (solid colors) faster than transparents which tend to need a bit more heat to get moving and workable, so it isn't the best torch for learning to encase. When working on perfecting round beads, stringers, and dot work, it does the job.
On the down side of the Fireworks torch, the automatic lighter only worked once, after that we used our grill lighter. Also, using small canisters, once the canister is about 1/2 empty, it starts to freeze up, so the already cool flame gets cooler and next to impossible to melt anything with it. So, the canister has to be submerged in warm water, or have a heating pad wrapped around it on low, to help keep the gas moving to the torch with enough pressure to keep the flame hot.
In just two months of minimal use, I had killed my first Fireworks, bought a second one at $29.99 (with my trusty 40% coupon), and had sent off to Sundance to get my first Hothead torch. We also made our family crockpot a dedicated vermiculite pot for garaging beads, such a worthy job!! :D
So, even with buying the kit, the second Fireworks torch, Mapp gas, extra glass, tools, and a Hothead... we still managed to keep our start up at under $200.
You can learn to lampwork on a shoestring. Remember, it isn't the torch that makes you a artist, it all comes down to skill. Don't be embarrassed to start wherever you have to, in time you can realize your dream. 8)
Labels:
art,
artist,
beads,
beginner,
equipment,
flamework,
flameworking,
getting started,
Hawley Studios,
how to,
kit,
Lampwork,
Lampworking,
learning,
newbie,
studio,
tools,
torch
Friday, June 20, 2008
Glass Bead Workshop- worthwhile!
Glass Bead Workshop by Jeri Warhaftig
Just when you thought you had aquired all the tools and goodies you would ever need again in your lampwork adventures (yeah... right... LOL) Jeri Warhaftig has authored a new lampworking book that is guaranteed to challenge you to see the world of lampwork in a new light.
This full color book is 144 pages packed with information! It dives headfirst into advanced techniques and concepts, just giving the faintest nod to basic info. Definitely a text designed with the more seasoned lampworker in mind, and it doesn't disappoint.
Advanced techniques are taught using step-by-step photos, thorough explanation, and very creative projects. Each project touches on a variety of materials, tools, and techniques which include: dichroic glass, copper and silver inclusions, enamels, cubic zirconia use, multi-stage bead assembly, fuming, etching, pressing, coldworking, hollow mandrels, disk forming, flower sculpting, vessels, and much more. The tips and appendices of the book condense a lot of great experience into an easy to access and utilize format.
Artist galleries that are included at the end of each chapter, full of inspiring examples of mixing the skills you learn with imagination and creating new, exciting pieces.
If you are looking for some fresh, new ideas and skills to spark your imagination and challenge you, this is the book for you. Tons of experience for the lampworker at the bargin price of $24.95!
Check it out for yourself, and add it to your lampwork glass library! It is available at Amazon.com: Glass Bead Workshop by Jeri Warhaftig
You can learn more about Jeri at her website: http://www.jeribeads.com/
Labels:
104COE,
art,
artist,
author,
beads,
book,
coldworking,
copper,
dichroic,
etching,
glass,
Glass Bead Workshop,
glasswork,
hollow,
Jeri Warhaftig,
Lampwork,
review,
silver,
skills,
techniques
Thursday, June 19, 2008
Copper and Lampwork Jewelry Gallery
A Sunny Day on a Greek Isle Necklace
This first piece features Italian Vetrofond lampwork beads and Czech glass beads on custom worked copper links. The soft colors of the beads accent the delicate appearance of this 22in. necklace. Colors include Lichen, Smoke Rings, and Bloody Mary.
Splashes of Pink on a Blue Day Bracelet (front)
This bracelet is a playful and eyecatching combination of bright Rubino pink and Pajama blue lampwork beads on custom copper work. Eyecatching fun for casual day and evening wear. The lampwork is Italian Effetre and Vetrofond using encasing, plunged bubbles, and stacked-dot work.
Thursday, June 5, 2008
A Useful Book to Add to Your Fused Glass Library
A Beginner's Guide to Kiln-Formed Glass
by Brenda Griffith
Here is a book well worth it's affordable price tag. Cover to cover, 128 pages of ideas and information. Designed to be useful for both beginners and those interested in exploring some more challenging and varied techniques in the world of fused glass. Page after page of well photographed examples to guide the reader, and beautiful glass artwork to tantilize and inspire.
Chapters include basics like materials, tools, supplies, skills like straight and curved glass cutting, and basic information on slumping, draping, fusing, and polishing. The author covers mold preparation, polishing, sandblasting, etching, and drilling.
There is a useful troubleshooting guide for the more common things that go wrong with your fused glass work, and suggestions for fixing those when possible.
The projects included in the book are varied and visually interesting. They range from simple pate de verre or draping to more complex work like creating and using bars or making various types of melt fusings. All the projects are artistically beautiful, and most of them are also functional.
The directions and fusing schedules are clearly outlined and easy to understand.
Brenda Griffith is a talented artist who has taken her time, experience, and considerable thought to put out a well written book at an affordable price for both beginners and those who are looking to add to their fusing skills and knowledge.
At the retail price of $24.95, it is worth adding to your fusing library.
Check out Amazon for your own copy of A Beginner's Guide to Kiln-Formed Glass.
You can learn more at Brenda at her website: http://www.glassincarnate.com/
Subscribe to:
Posts (Atom)
About Us
- Hawley Studios
- Texas, United States
- Welcome to Hawley Studios!!
This is the place where imagination and fire collide! Wherever our imagination and creativity take us, that is where we go! The sky is the limit......
20 years together has caused this married couple to play with fire, hammer and grind metal, and design guns and knives! LOL!! Welcome to our world of marital bliss!!
Enter in to experience creations of glass, polymer, silver, metal... whatever we can get our hands on! :D
Hawley Studios is family owned. We specialize in lampworking, fusing, slumping, jewelry, metal work, custom knife making, and custom gunsmithing.
Proud Members of:
* Etsy Christian Artists Street Team (CAST)
* Creative Glass Guild of Esty (CGGE)
* Etsy Lampwork Etc. Street Team (LEST)
* Self Representing Artists- lampworking (SRA #H109)